Introduction
Quickly after I made the arduino rc car, I wanted to experiment with another communication
method instead of radio signals using the nRF24l01 module. That’s why I decided to learn
more about Bluetooth. I already watched and read some tutorials, but they were never completed.
Here I will explain to you all the electronics and programming (esp32 and MIT app inventor)
steps to make your own Bluetooth controlled tank using your smartphone. The first step will
be to make our own App using the free MIT app Inventor website and then to code our esp32 using
the Arduino IDE.
Goals
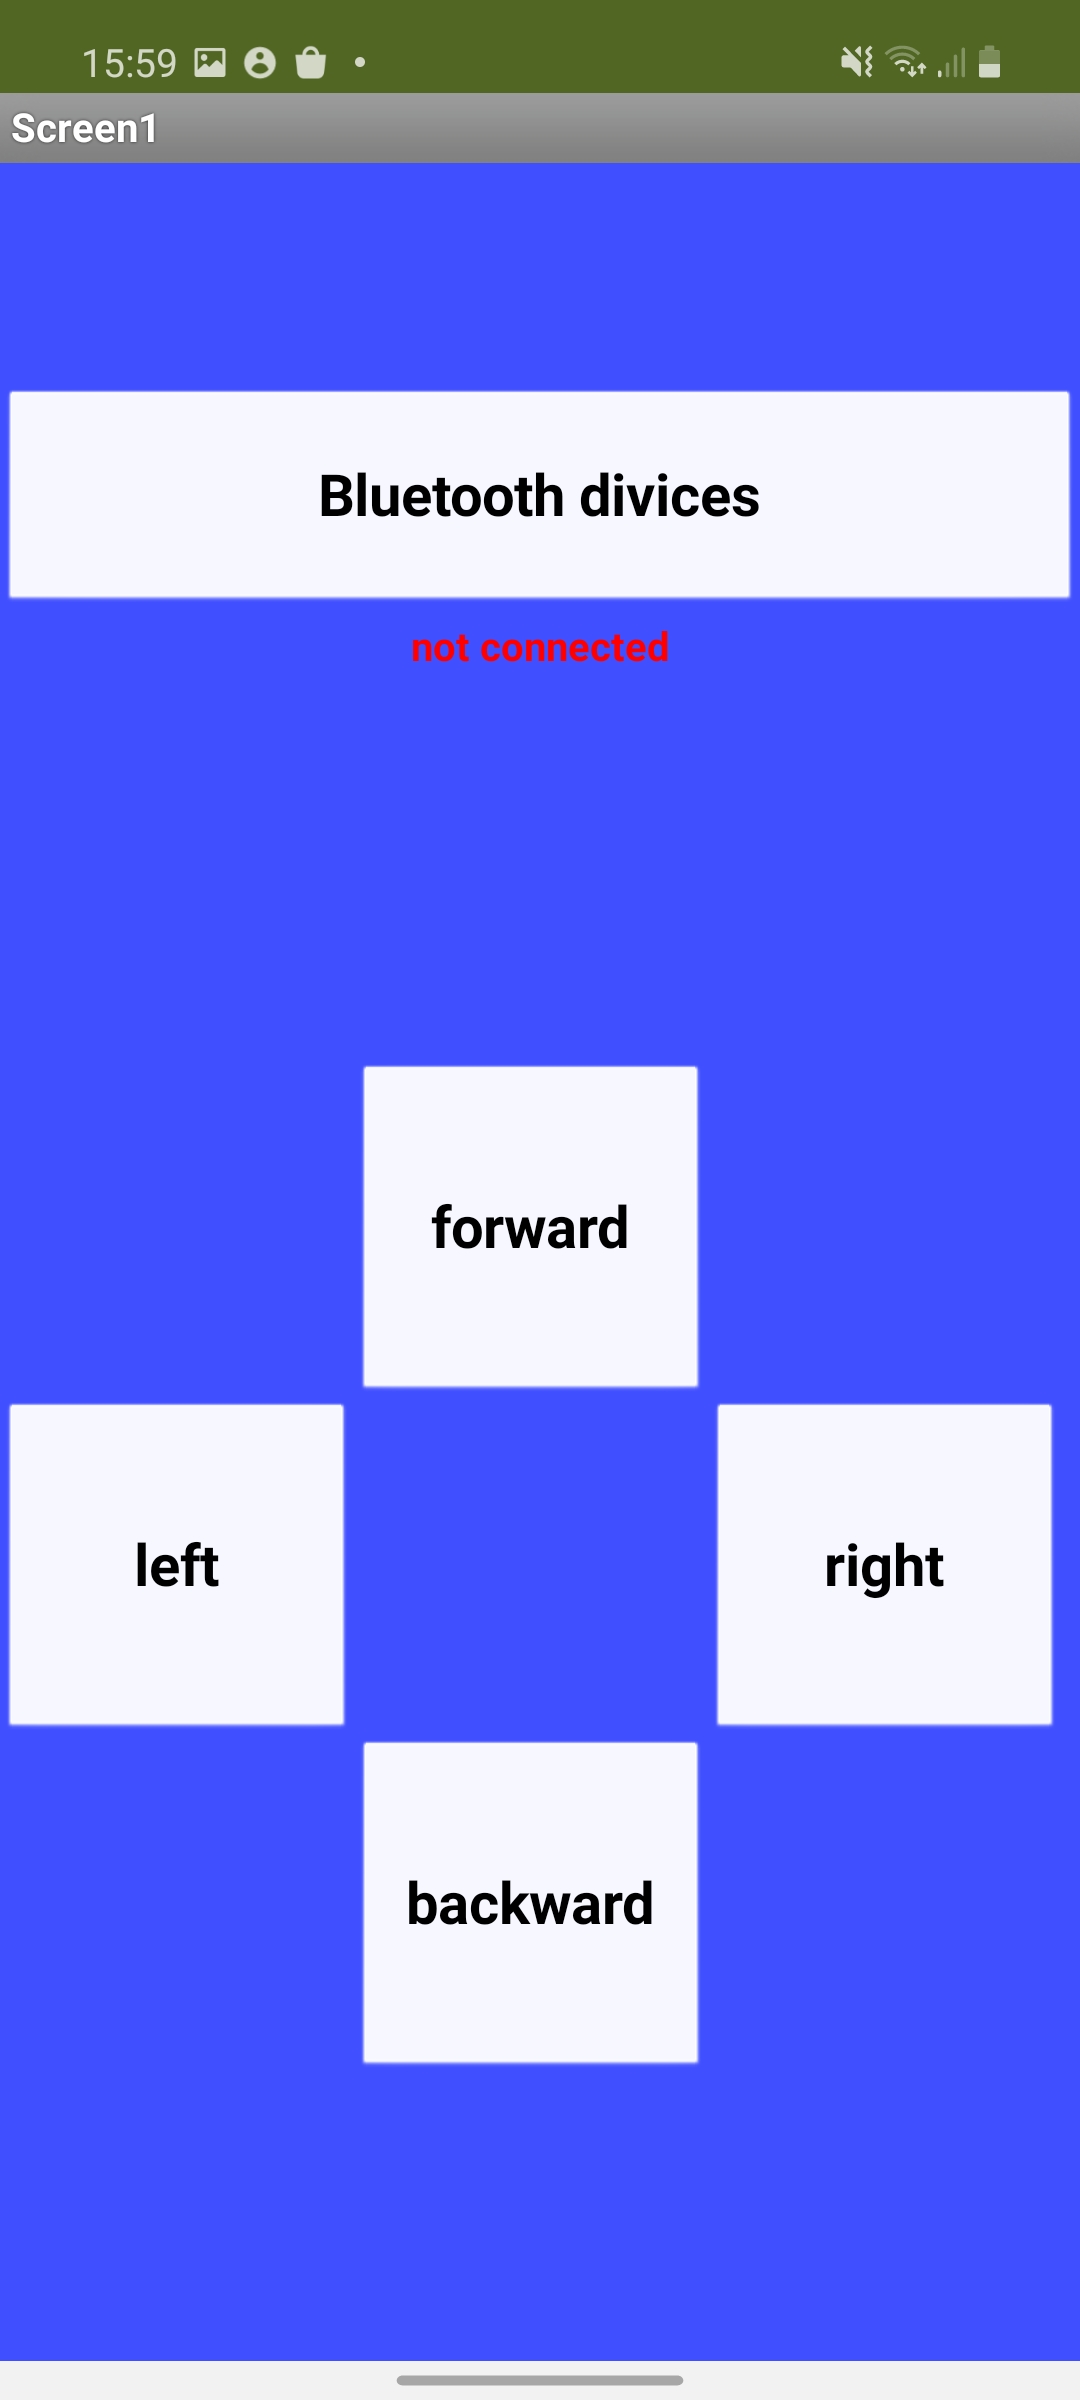
Well, in this project our goal will be to control two motors on an esp32 using our smartphone.
Like you can see in the next photo, the interface of my app will be very simple. We will control
the direction of our tank by clicking on the buttons underneed. Of course this project is not finished,
we will add some leds and other controls later but today we will learn the basics of our tank. Interested?
Well let’s start!

Electronic part
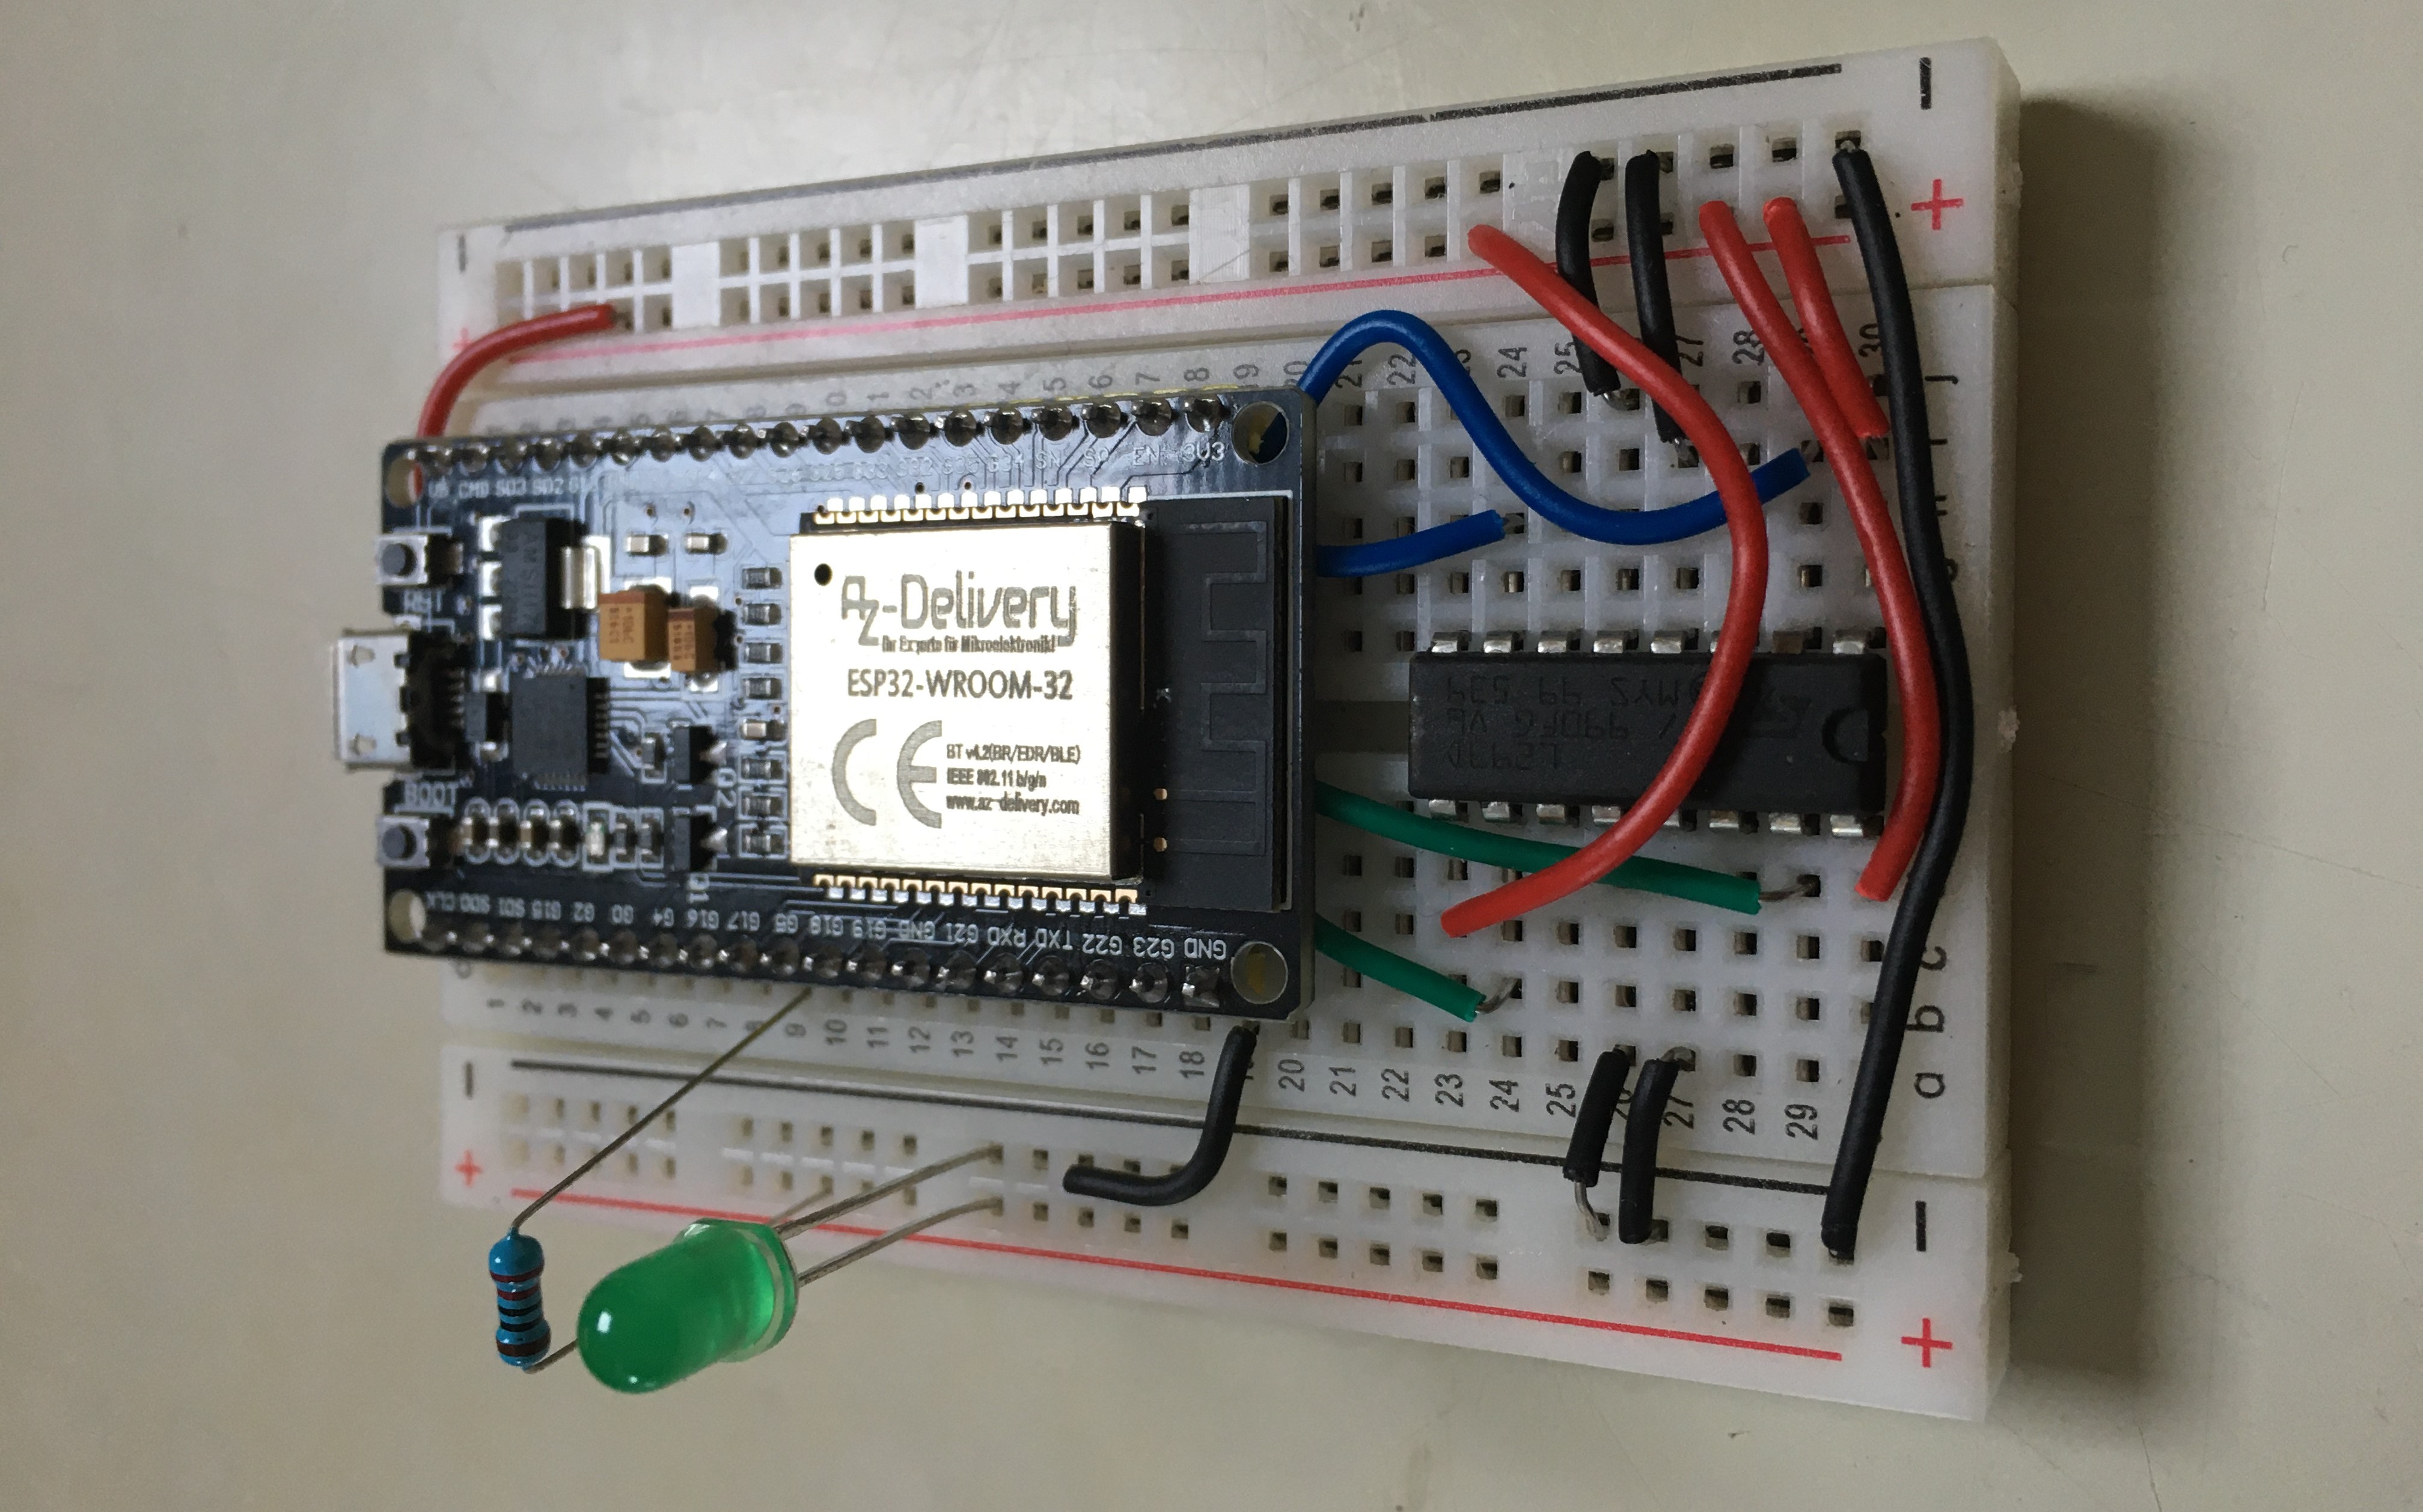
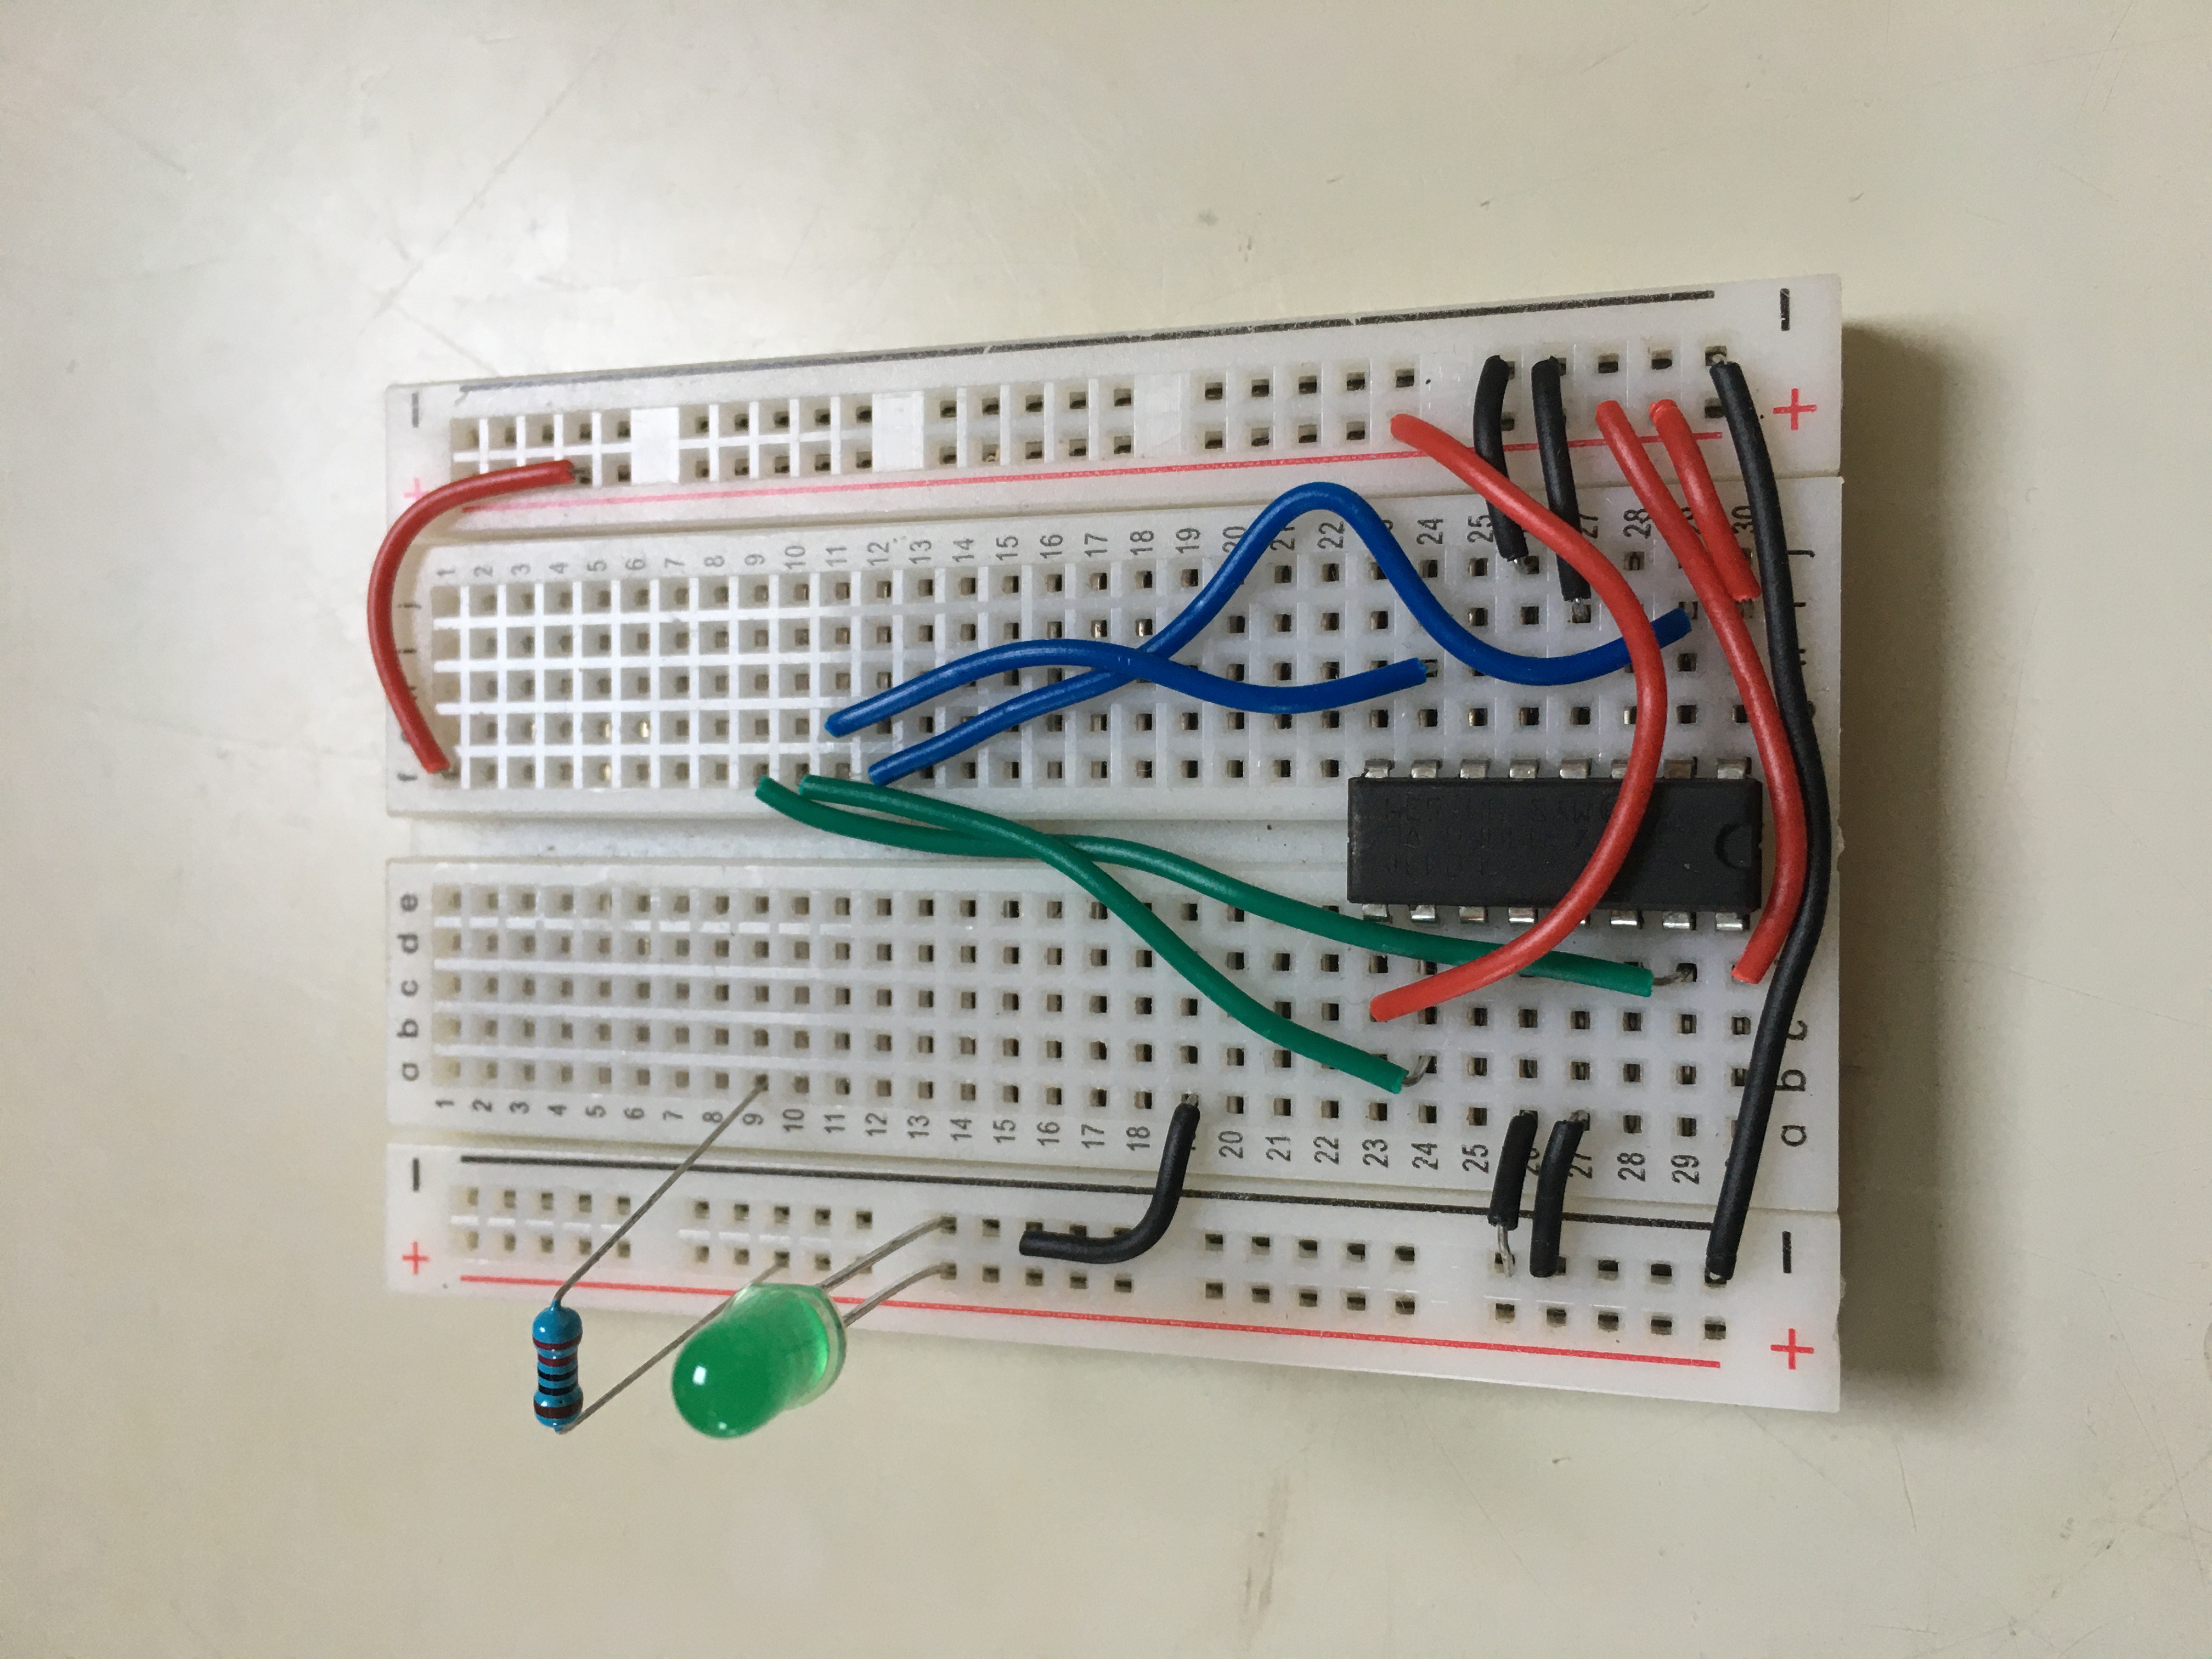
The electronic part is really easy. I will use 2 9V DC motors that I will control using an l293d motor shield.
The four pins that I will use to control the rotation of the motor are the 33, 25, 27 and 26 on my esp32-WROOM-32
model. The motors will always rotate at 100% of speed (so no PWM). Here is a picture :
MIT App Inventor
The mit app inventor is a very good website to make your own little apps on mobile (IOS and Android (for Bluetooth only Android!!!)).
Certainly if it is a temporary app where you don’t want to spend days making it. To make it, you will
firstly have to go to the official website of the MIT app inventor. Here is the link :
https://appinventor.mit.edu/. Then you can click on the button
“create app” to build an app. After you make an account you will come to a page where you can build your app.
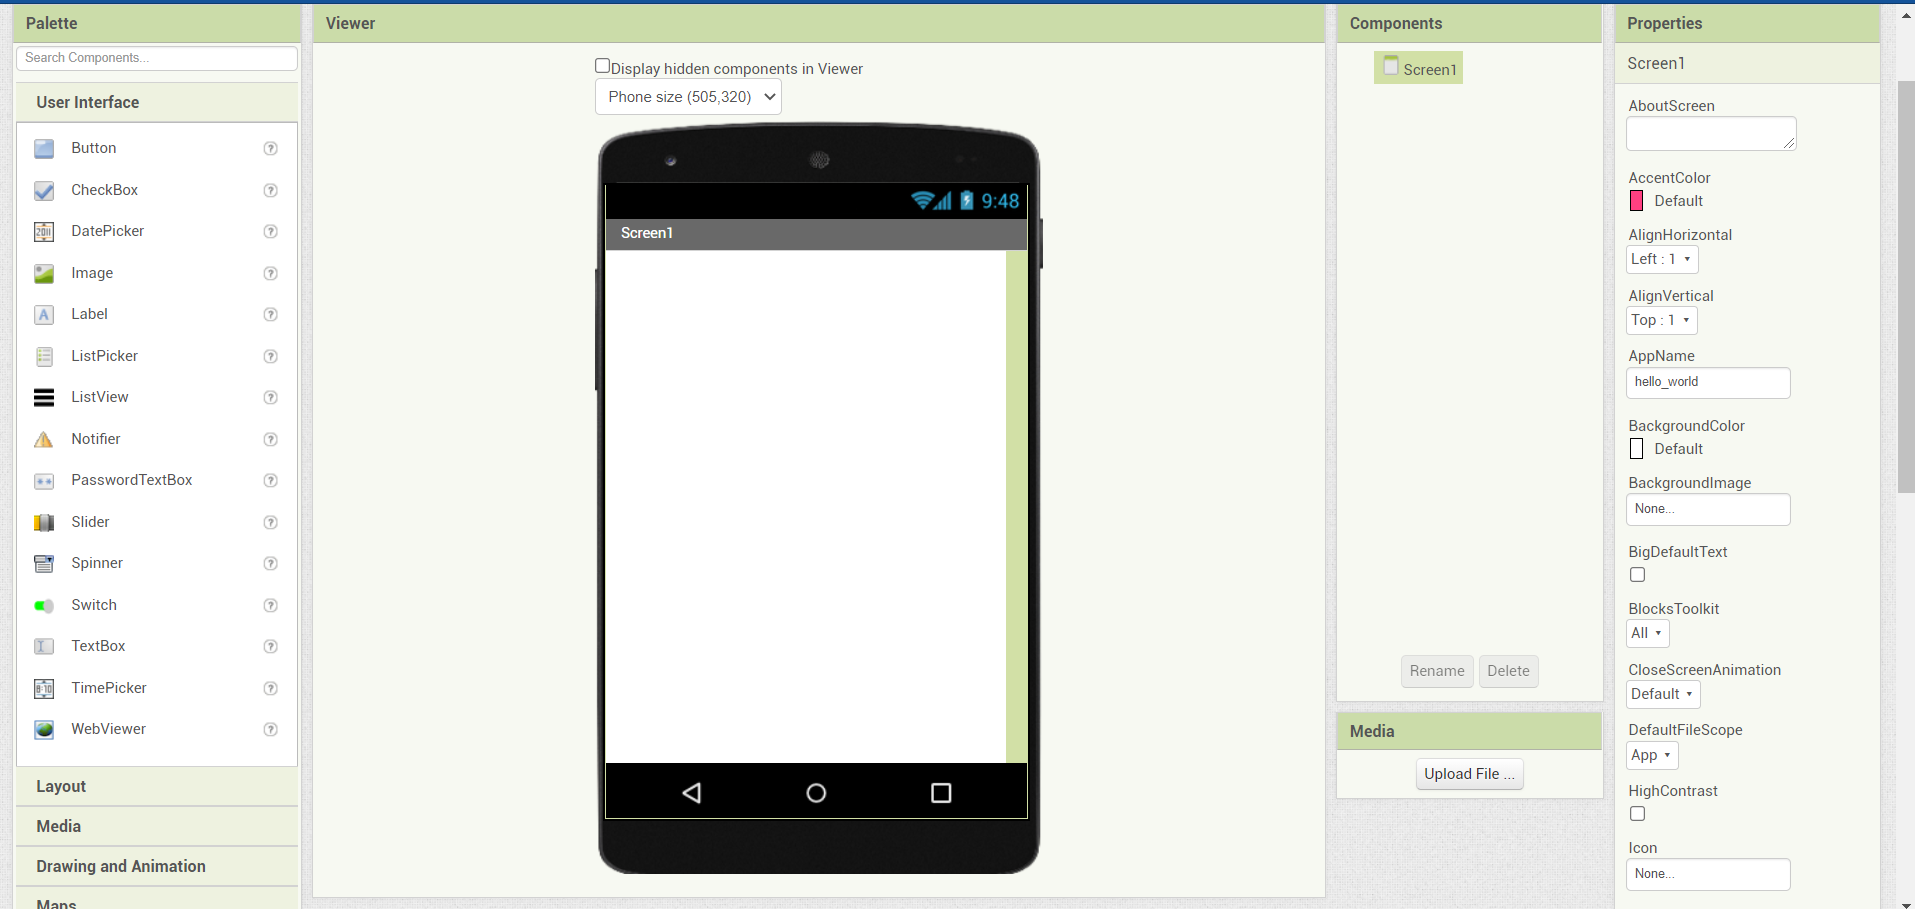
Here you can click on the button “start new project” on the top left corner. Name it, and now you will come to a page like that one :
The first step is to make the layout of our app, we will make the interactions later. The system is pretty simple because you just have to drag and drop what you want on the screen. Take some time to discover all the different palettes with their components. For our tutorial, we will use only a few components. In the “user interface” palette we will only use a button, label and a listpicker. In the layout palette, we will only use the horizontal and table arrangement. These will make our app nice looking. In the sensor palette, we will use the clock component and in the connectivity palette, we will use the Bluetooth Client component. Our clock component will start a function every time interval (default every second but you can change it in the properties). The BluetoothClient component will make our Bluetooth connection possible. Don’t panic if you don’t see the elements on the screen, these will never appear. Now you can just drag and drop the elements on the screen. They will also appear in the component palette. Here is an overview of how I made my app.
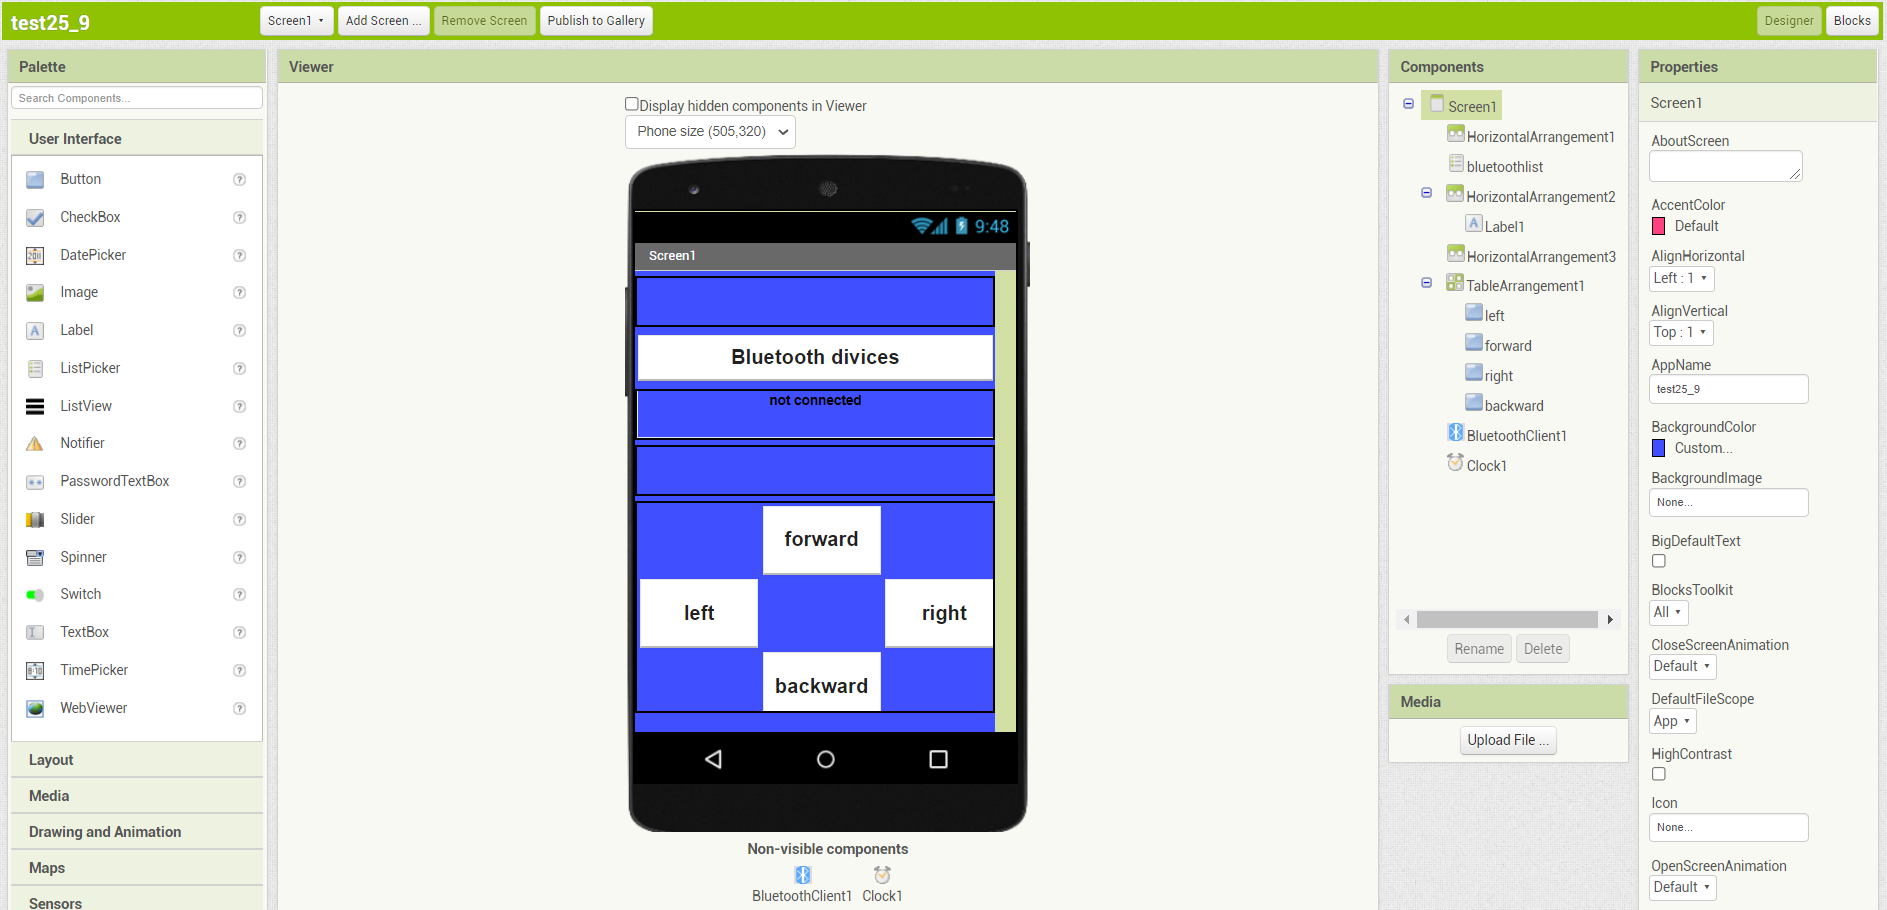
Don’t forget to change the properties of each component. To make a component taking all the width of the screen, you will have to set the width to “match parents”. Now it will take the full space of the parent element (see component palette). Don’t forget to simplify all your widgets by renaming it. If all the components are added, you can now click on connect (top left) and then Al companion. Here will popup a new window asking to scan a QR code. You will have to scan it by firstly downloading the MIT app inventor in the App and Play store. Open the app on your smartphone and scan the QR code. Now you can properly see the layout on your screen. If you are happy with your layout, we can now start with the logic part of the app. Click on the “block” button top right of the screen. Now you should see this on your screen.

Take some time to discover all the different block-codes by clicking on an element of the blocks palette.
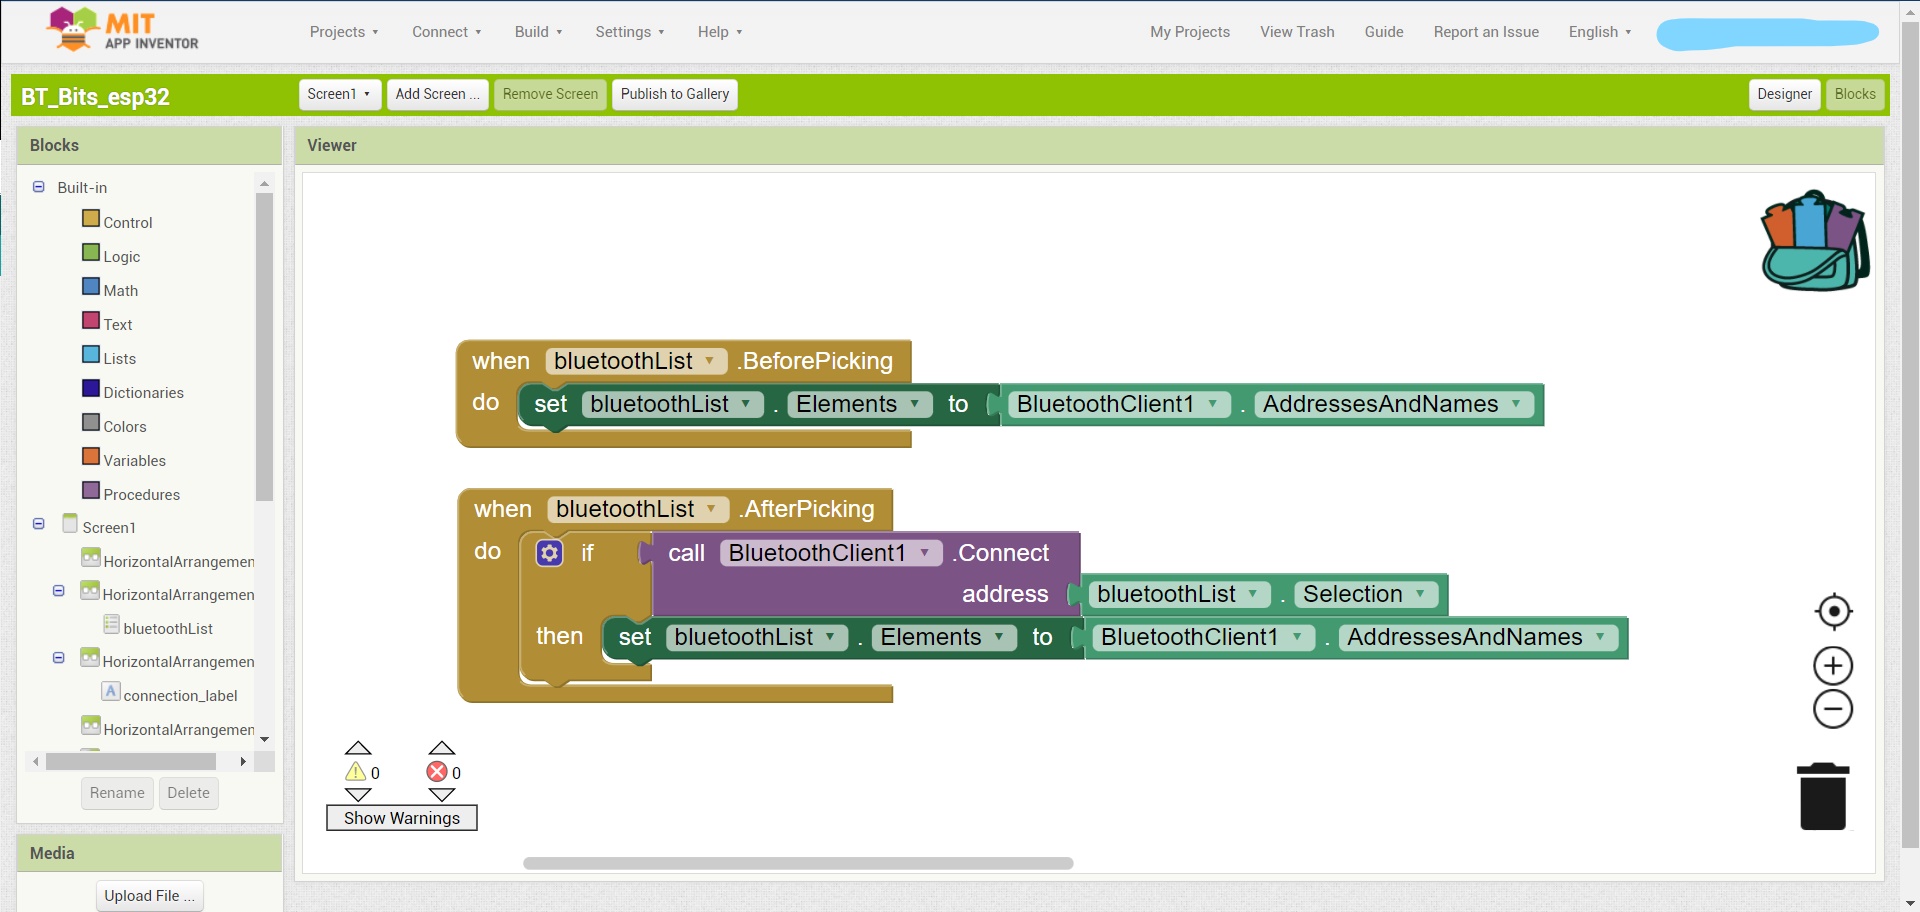
Now let’s make our app! The first step will be to control the ListPicker. There are two control blocks we will use for it. These are called .BeforePicking and .AfterPicking. Inside we will set the BluetoothList.elements to the addresses and names of our BluetoothClient1 (you can find this instruction inside the BluetoothClient1 block). That’s all for the .BeforePicking. For the .AfterPicking you will have to add a if-then control block which will only show the addresses and names of our BluetoothClient1 if our smartphone is well-connected to the esp32. Therefore we use the “call BluetoothClient1.Connectaddress” function and by adding the Bluetooth.Selection to our block.
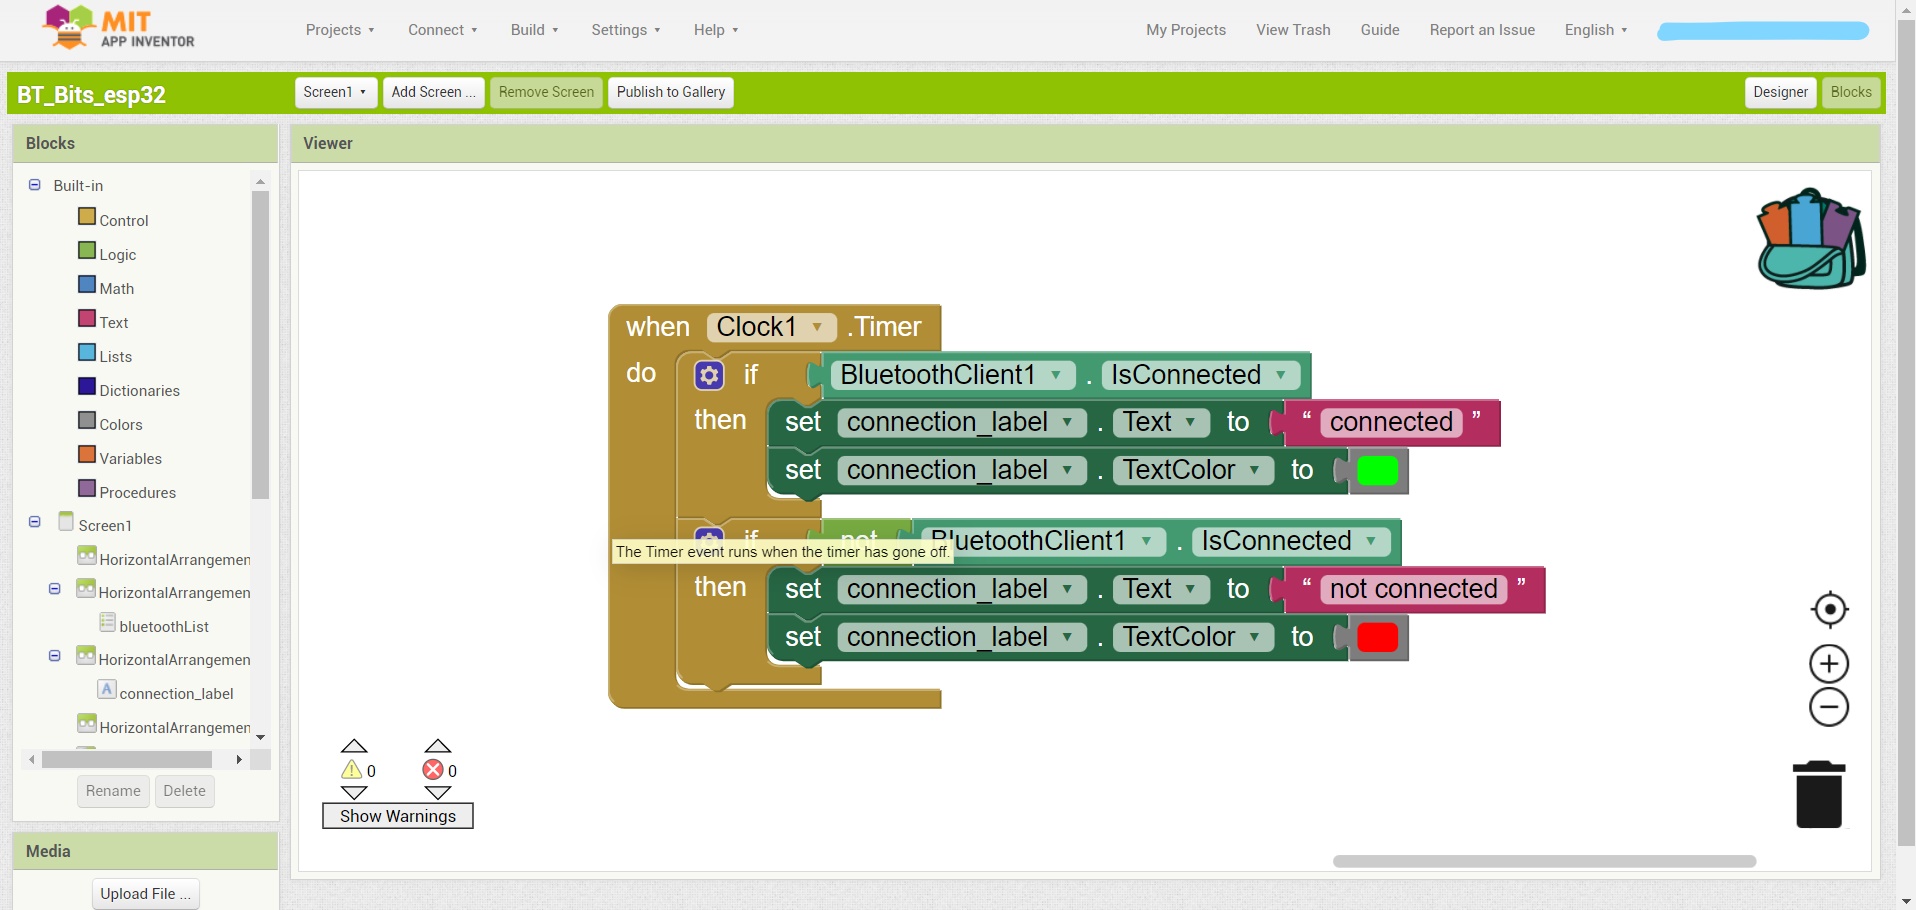
Let’s now take a look at the Clock1 block. This is a function that will be called every 1000 milliseconds or every 1 seconds. The main function of it is to see if we are still connected to the esp32 and if we can clearly send data or not. So we have two if-then blocks, inside of it we first check if we are connected. If True then we can set our connection_label to “connected” with a green color. Otherwise we will set the text “not connected” with a red textcolor.
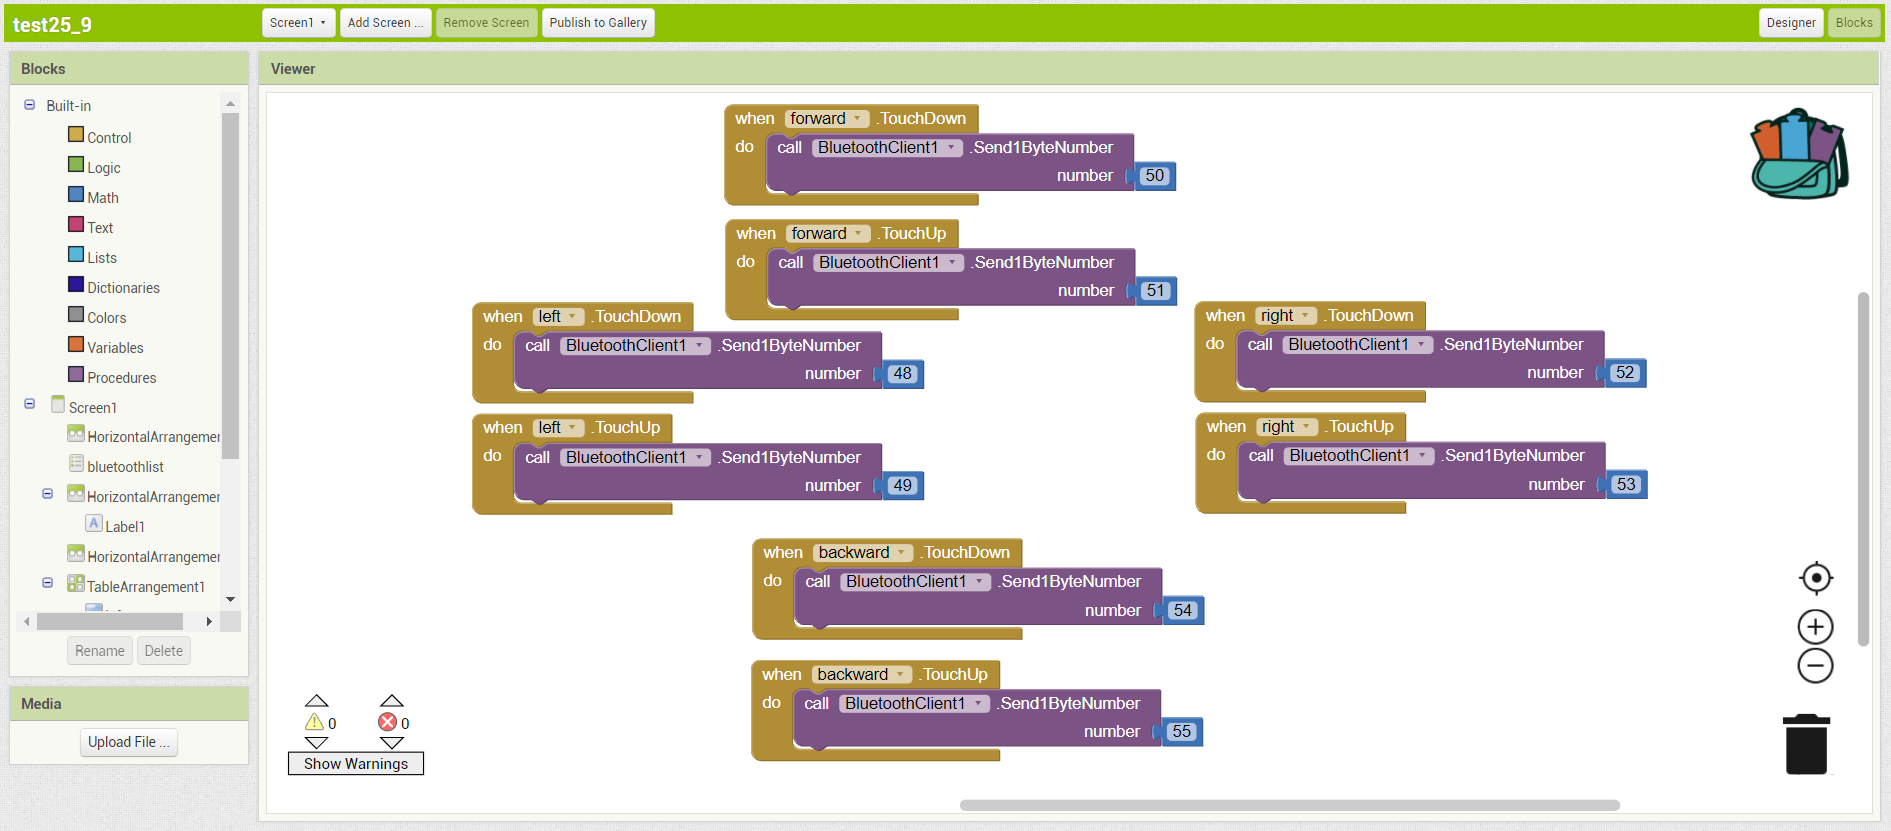
Finally let’s talk about our buttons. For each button it’s the same thing. We declare two functions. One will be called when we’re pressing the button, the other one is called when we release the button. For each function we send a 1-bite number. The numbers are important for our arduino code later.
Here are all the blocks needed for the app.

Here you can click on the button “start new project” on the top left corner. Name it, and now you will come to a page like that one :
The first step is to make the layout of our app, we will make the interactions later. The system is pretty simple because you just have to drag and drop what you want on the screen. Take some time to discover all the different palettes with their components. For our tutorial, we will use only a few components. In the “user interface” palette we will only use a button, label and a listpicker. In the layout palette, we will only use the horizontal and table arrangement. These will make our app nice looking. In the sensor palette, we will use the clock component and in the connectivity palette, we will use the Bluetooth Client component. Our clock component will start a function every time interval (default every second but you can change it in the properties). The BluetoothClient component will make our Bluetooth connection possible. Don’t panic if you don’t see the elements on the screen, these will never appear. Now you can just drag and drop the elements on the screen. They will also appear in the component palette. Here is an overview of how I made my app.
Don’t forget to change the properties of each component. To make a component taking all the width of the screen, you will have to set the width to “match parents”. Now it will take the full space of the parent element (see component palette). Don’t forget to simplify all your widgets by renaming it. If all the components are added, you can now click on connect (top left) and then Al companion. Here will popup a new window asking to scan a QR code. You will have to scan it by firstly downloading the MIT app inventor in the App and Play store. Open the app on your smartphone and scan the QR code. Now you can properly see the layout on your screen. If you are happy with your layout, we can now start with the logic part of the app. Click on the “block” button top right of the screen. Now you should see this on your screen.
Take some time to discover all the different block-codes by clicking on an element of the blocks palette.
Now let’s make our app! The first step will be to control the ListPicker. There are two control blocks we will use for it. These are called .BeforePicking and .AfterPicking. Inside we will set the BluetoothList.elements to the addresses and names of our BluetoothClient1 (you can find this instruction inside the BluetoothClient1 block). That’s all for the .BeforePicking. For the .AfterPicking you will have to add a if-then control block which will only show the addresses and names of our BluetoothClient1 if our smartphone is well-connected to the esp32. Therefore we use the “call BluetoothClient1.Connectaddress” function and by adding the Bluetooth.Selection to our block.
Let’s now take a look at the Clock1 block. This is a function that will be called every 1000 milliseconds or every 1 seconds. The main function of it is to see if we are still connected to the esp32 and if we can clearly send data or not. So we have two if-then blocks, inside of it we first check if we are connected. If True then we can set our connection_label to “connected” with a green color. Otherwise we will set the text “not connected” with a red textcolor.
Finally let’s talk about our buttons. For each button it’s the same thing. We declare two functions. One will be called when we’re pressing the button, the other one is called when we release the button. For each function we send a 1-bite number. The numbers are important for our arduino code later.
Here are all the blocks needed for the app.
Arduino code
Now let’s see how the arduino code works.
We first include our Bluetooth library that you have to download in the library.
Then we make objects for our library. and declare all our pin numbers. Finally we check
if there are problems with the SDK of the smartphone.
In the setup section, we begin our Bluetooth serial communication by passing the name of our device in the parameters. Then we begin our serial communication at 115200 bps and we print a little message to say that everything is ok. Finally we declare all our pins as outputs. Pin 17 will light up if we receive information no matter what it is. It’s there just to check for errors.
In the loop section we firstly see if we receive something. Yes, then we define our BTData variable and make the light blink. Then my code isn’t really optimised because we will each time check if the value corresponds to BTData. Yes, then we do something. I think the code is pretty clear.
In the setup section, we begin our Bluetooth serial communication by passing the name of our device in the parameters. Then we begin our serial communication at 115200 bps and we print a little message to say that everything is ok. Finally we declare all our pins as outputs. Pin 17 will light up if we receive information no matter what it is. It’s there just to check for errors.
                #include

                BluetoothSerial SerialBT;
                int BTData;

                byte motor1base1 = 26;
                byte motor1base2 = 27;
                byte motor2base1 = 25;
                byte motor2base2 = 33;

                /* Check if Bluetooth configurations are enabled in the SDK */
                #if !defined(CONFIG_BT_ENABLED) || !defined(CONFIG_BLUEDROID_ENABLED)
                #error Bluetooth is not enabled! Please run `make menuconfig` to and enable it
                #endif

                void setup()
                  {
                    Serial.begin(115200);
                    SerialBT.begin("hello world");
                    Serial.println("Bluetooth Started! Ready to pair...");
                    pinMode(motor1base1, OUTPUT);
                    pinMode(motor1base2, OUTPUT);
                    pinMode(motor2base1, OUTPUT);
                    pinMode(motor2base2, OUTPUT);
                    pinMode(17, OUTPUT);
                  }
In the loop section we firstly see if we receive something. Yes, then we define our BTData variable and make the light blink. Then my code isn’t really optimised because we will each time check if the value corresponds to BTData. Yes, then we do something. I think the code is pretty clear.
                void loop()
                  {
                    if(SerialBT.available())
                    {
                      BTData = SerialBT.read();
                      //Serial.write(BTData);
                      digitalWrite(17, HIGH);
                    }

                    if (BTData == 48) {
                      // left start
                      digitalWrite(motor1base1, HIGH);
                      digitalWrite(motor1base2, LOW);
                      digitalWrite(motor2base1, LOW);
                      digitalWrite(motor2base2, HIGH);
                    } else if (BTData == 49) {
                      // left stop
                      digitalWrite(motor1base1, LOW);
                      digitalWrite(motor1base2, LOW);
                      digitalWrite(motor2base1, LOW);
                      digitalWrite(motor2base2, LOW);
                    } else if (BTData == 50) {
                      // forward start
                      digitalWrite(motor1base1, HIGH);
                      digitalWrite(motor1base2, LOW);
                      digitalWrite(motor2base1, HIGH);
                      digitalWrite(motor2base2, LOW);
                    } else if (BTData == 51) {
                      // forward stop
                      digitalWrite(motor1base1, LOW);
                      digitalWrite(motor1base2, LOW);
                      digitalWrite(motor2base1, LOW);
                      digitalWrite(motor2base2, LOW);
                    } else if (BTData == 52) {
                      // right start
                      digitalWrite(motor1base1, LOW);
                      digitalWrite(motor1base2, HIGH);
                      digitalWrite(motor2base1, HIGH);
                      digitalWrite(motor2base2, LOW);
                    } else if (BTData == 53) {
                      // right stop
                      digitalWrite(motor1base1, LOW);
                      digitalWrite(motor1base2, LOW);
                      digitalWrite(motor2base1, LOW);
                      digitalWrite(motor2base2, LOW);
                    } else if (BTData == 54) {
                      // backward start
                      digitalWrite(motor1base1, LOW);
                      digitalWrite(motor1base2, HIGH);
                      digitalWrite(motor2base1, LOW);
                      digitalWrite(motor2base2, HIGH);
                    } else if (BTData == 55) {
                      // backward stop
                      digitalWrite(motor1base1, LOW);
                      digitalWrite(motor1base2, LOW);
                      digitalWrite(motor2base1, LOW);
                      digitalWrite(motor2base2, LOW);
                    } else {
                      digitalWrite(25, LOW);
                      digitalWrite(26, LOW);
                      digitalWrite(14, LOW);
                      digitalWrite(12, LOW);
                    }
                  }
Arduino Code
Here's the entire code :
               #include

                BluetoothSerial SerialBT;
                int BTData;

                byte motor1base1 = 26;
                byte motor1base2 = 27;
                byte motor2base1 = 25;
                byte motor2base2 = 33;

                /* Check if Bluetooth configurations are enabled in the SDK */
                #if !defined(CONFIG_BT_ENABLED) || !defined(CONFIG_BLUEDROID_ENABLED)
                #error Bluetooth is not enabled! Please run `make menuconfig` to and enable it
                #endif

                void setup()
                {
                  Serial.begin(115200);
                  SerialBT.begin("hello world");
                  Serial.println("Bluetooth Started! Ready to pair...");
                  pinMode(motor1base1, OUTPUT);
                  pinMode(motor1base2, OUTPUT);
                  pinMode(motor2base1, OUTPUT);
                  pinMode(motor2base2, OUTPUT);
                  pinMode(17, OUTPUT);
                }

                void loop()
                {
                  if(SerialBT.available())
                  {
                    BTData = SerialBT.read();
                    //Serial.write(BTData);
                    digitalWrite(17, HIGH);
                  }

                  if (BTData == 48) {
                    // left start
                    digitalWrite(motor1base1, HIGH);
                    digitalWrite(motor1base2, LOW);
                    digitalWrite(motor2base1, LOW);
                    digitalWrite(motor2base2, HIGH);
                  } else if (BTData == 49) {
                    // left stop
                    digitalWrite(motor1base1, LOW);
                    digitalWrite(motor1base2, LOW);
                    digitalWrite(motor2base1, LOW);
                    digitalWrite(motor2base2, LOW);
                  } else if (BTData == 50) {
                    // forward start
                    digitalWrite(motor1base1, HIGH);
                    digitalWrite(motor1base2, LOW);
                    digitalWrite(motor2base1, HIGH);
                    digitalWrite(motor2base2, LOW);
                  } else if (BTData == 51) {
                    // forward stop
                    digitalWrite(motor1base1, LOW);
                    digitalWrite(motor1base2, LOW);
                    digitalWrite(motor2base1, LOW);
                    digitalWrite(motor2base2, LOW);
                  } else if (BTData == 52) {
                    // right start
                    digitalWrite(motor1base1, LOW);
                    digitalWrite(motor1base2, HIGH);
                    digitalWrite(motor2base1, HIGH);
                    digitalWrite(motor2base2, LOW);
                  } else if (BTData == 53) {
                    // right stop
                    digitalWrite(motor1base1, LOW);
                    digitalWrite(motor1base2, LOW);
                    digitalWrite(motor2base1, LOW);
                    digitalWrite(motor2base2, LOW);
                  } else if (BTData == 54) {
                    // backward start
                    digitalWrite(motor1base1, LOW);
                    digitalWrite(motor1base2, HIGH);
                    digitalWrite(motor2base1, LOW);
                    digitalWrite(motor2base2, HIGH);
                  } else if (BTData == 55) {
                    // backward stop
                    digitalWrite(motor1base1, LOW);
                    digitalWrite(motor1base2, LOW);
                    digitalWrite(motor2base1, LOW);
                    digitalWrite(motor2base2, LOW);
                  } else {
                    digitalWrite(25, LOW);
                    digitalWrite(26, LOW);
                    digitalWrite(14, LOW);
                    digitalWrite(12, LOW);
                  }
                }
Conclusion
Voila, now you know how I made it, hope you enjoyed it, don't hesitate to watch my other
projects… Thanks.